Using a Scrum kit on a whiteboard is a great way to implement the Scrum framework visually and facilitate teams working together towards a common goal. Here’s a step-by-step guide on how to set up and use a Scrum kit on a whiteboard:
Materials Needed:
- Large Magnetic Whiteboard or a magnetic 3 or 4 sided whiteboard stand.
- Markers or whiteboard pens in different colors.
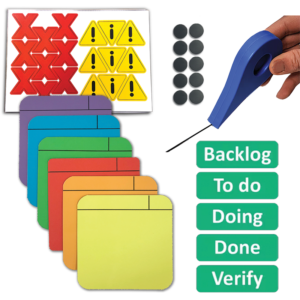
- SCRUM KIT. Our Scrum kit includes:
- Magnetic Dry Erase Notes (in 6 different colors)
- 5 Scrum Headers (Backlog, To Do, Doing, Done & Verify)
- 9 each of Magnetic “X” & Warning Triangles
- 10 Black Memo Magnets
- Black Gridding Tape
-
 Scrum Kit$55.18
Setting Up the Whiteboard:
- Draw the Scrum Board: Divide the whiteboard into three main columns: “To Do,” “In Progress,” and “Done.” You can also include additional columns such as “Backlog” or “Sprint Goals” depending on your team’s needs. This can be done with our gridding tape. Use the Scrum Headers for the top of the columns.
- Create Sections for Each Scrum Artifact:
- Product Backlog: Reserve space on the whiteboard to list all the items in the product backlog. The product backlog is where all work for the development team lives. It is a complete list of all the tasks your team needs to accomplish to take your product to market.
- Sprint Backlog: Allocate space within the “To Do” column for the sprint backlog items. This is a subset of items from the product backlog that the team needs to complete within a specific sprint.
- Sprint Goal: Dedicate a section of the board to display the sprint goal for the current sprint. These are specific objectives the team wants to achieve by the end of the predetermined length of time.
- Burndown Chart: If desired, create space for a burndown chart to track sprint progress over time.
Using the Scrum Kit:
- Product Backlog Refinement:
- Write each user story or task on a separate Magnetic Dry Erase Note.
- Place these items in the “Product Backlog” section of the board.
- Use different colors to represent different types of tasks or priorities.
- Sprint Planning:
- During sprint planning meetings, move selected items from the product backlog into the “Sprint Backlog” section.
- Break down tasks into smaller sub-tasks if necessary and write them on separate dry erase notes.
- Assign tasks to team members and estimate effort (e.g., using story points).
- Daily Stand-ups:
- During daily stand-up meetings, move dry erase notes representing tasks from “To Do” to “In Progress” as team members start working on them.
- Use markers to update task statuses or add notes directly on the dry erase notes.
- Progress Tracking:
- Throughout the sprint, update the board as tasks progress.
- Move completed tasks to the “Done” column.
- Update the burndown chart if applicable to reflect remaining work.
- Review and Retrospective:
- At the end of the sprint, review the board during the sprint review meeting.
- Reflect on what went well and what could be improved during the sprint retrospective.
- Continuous Improvement:
- Use the insights gained from sprint retrospectives to make improvements to the Scrum process and the way the board is used.
By setting up and using a Scrum kit on a whiteboard, teams can visualize their work, track progress, and collaborate effectively throughout the sprint cycle. The entire team gains visibility on all tasks, backlogs, user stories, statuses, and other categories. This gives your team complete transparency on the progress of every component.


